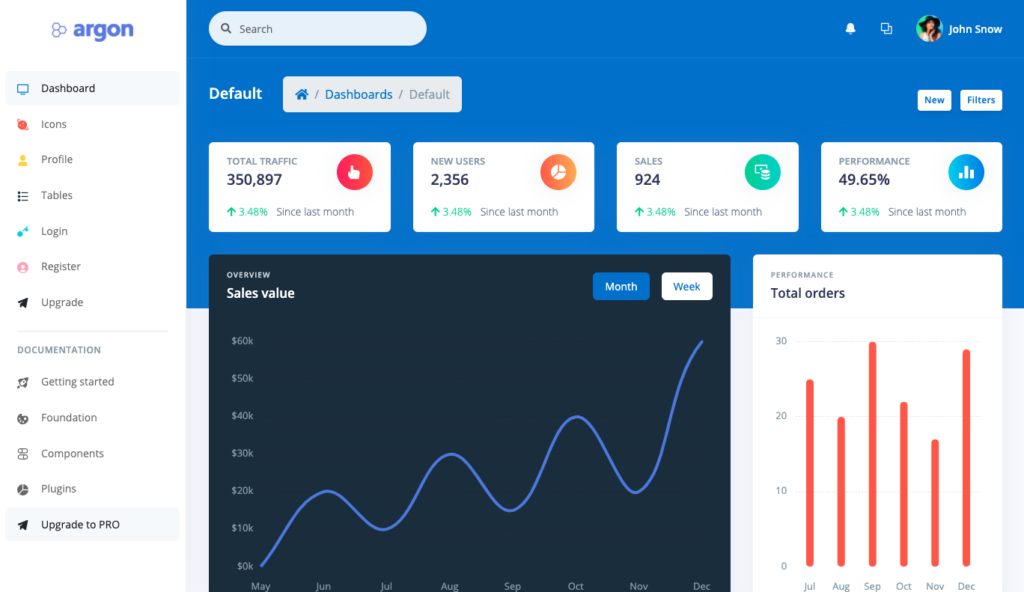
Argon Dashboard from Creative Tim is an amazing tool to kickstart your next project. It’s open-source and provides over 100 individual components and pages, plus a consistent design right out of the box.
But if you want to build a dynamic web application with user accounts, complex data modeling, and all the functionality you need to fully bring it to life, you’ll probably need to use a web framework.
Just like Argon Dashboard gives you all the UI components you need to build a beautiful dashboard, Ruby on Rails gives you everything you need to turn it into an actual web application that works and scales. It powers small startups, side projects, and even huge companies like GitHub, Shopify, and Airbnb.
On their own, Argon Dashboard and Rails are fantastic. Together, they’re even better! But figuring out how to combine them can be quite challenging.
Luckily, DinoSaaS has done the hard work for you – they’ve combined Argon Dashboard with Rails and open-sourced the result as an app template on Github.
In this tutorial, we’ll walk you through how to get started with Argon Dashboard and Ruby on Rails in just 5 minutes. Then we’ll show you how to customize your dashboard and turn it into a full-fledged web application that your users will love.
Up and Running in 5 Minutes
Download Argon Dashboard and get it running on localhost.
In your terminal, clone the repository to your local filesystem.
git clone [email protected]:Dino-Saas/Argon.git argon-demo
Now you’ll need to take a couple steps to download the latest versions of required Ruby gems and Javascript packages.
First, run bundle install to download the right gems with the right versions (as specified in the Gemfile).
bundle install
Next, update Yarn packages as specified in package.json.
yarn install
Now start up your server.
rails server
Point your browser to https://localhost:3000 and check out your stunning new Rails dashboard!
Diving into the Codebase
Assembling a Rails app is even more complex than assembling IKEA furniture. And just like an IKEA dresser, you shouldn’t have to go at it without instructions.
We’ll walk you through how some of the more important pieces are assembled.
Background Topics
This guide does not attempt to be a deep technical resource on the inner workings of Ruby on Rails. There are plenty of resources online for that, but we’ll try and point you in the right direction when we can.
If you’re unfamiliar with them, it’d be a good idea to read up on the basics of a few topics:
Stylesheets
Argon Dashboard’s stylesheets use Sass. It all starts in the application layout file – application.html.erbrel="nofollow". There, we link to our application.scss manifest file:
<%= stylesheet_link_tag 'application', media: 'all', 'data-turbolinks-track': 'reload' %>
application.scss tells Sprockets which stylesheets to include and in what order via @import directives.
We’ll walk through how to use these stylesheets to customize your app’s look and feel shortly.
Javascript
Our Javascript journey starts back in application.html.erb. Here, we include our application javascript pack with Webpacker:
<%= javascript_pack_tag 'application', 'data-turbolinks-track': 'reload' %>
This references our application.js manifest file. Similar to application.scss, application.js contains a sequence of require directives telling Sprockets which files to include and in which order.
argon.js is one of those included files. It has all the custom javascript included with the theme. It’s well commented and broken up by component.
Images
Images can be found in app/assets/images.
We render them using image_tag. This helper method generates the <img> tag that we know and love.
With image_tag, we specify only a relative path from one of the default asset locations that Sprockets know to look for. For example, you’ll see the following in pages/_sidenav.html.erb:
<%= image_tag "brand/blue.png", class: "navbar-brand-img", alt: "..." %>
See Section 2.2.1 in the official Rails docs on The Asset Pipeline if you’d like to learn more about how Sprockets loads images and other assets.
When you deploy to production, you’ll want to move your images to a Content Delivery Network (CDN) like Cloudfront or Cloudinary. This will force you to use some different helper methods but will be well worth it to decrease page load times. We’ll go over this more in-depth in a later post.
Icons
Argon Dashboard is configured to use 2 different sources of icons:
- Nucleo Icons
See the Creative Tim docs on icons to see what’s available and how to use them. You can also check out icons.html.erb in Argon Dashboard for plenty of examples like this one:
<i class="ni ni-active-40"></i>
- Font Awesome (and the
font-awesome-rails lets us include icons using the fa_icon helper method. Check out pages/logged_out/_topnav.html.erb for some examples like this:
<%= fa_icon 'facebook' %>
FontAwesome has thousands of free and premium icons to choose from on their website.
Views
For simplicity, we’ve organized all our views under a generic pages directory. They all have empty (currently not defined) actions in PagesController. I would not recommend continuing this simplistic pattern when you extend the app for your own purposes.
All views start with the application layout file – application.html.erb. Rails renders the appropriate view file where we call yield in the layout. Read more on layouts here in the Rails docs.
Each view file is further broken up into partials. A partial is a way of dividing up a bigger file into smaller chunks. It avoids having massive files with thousands of lines. More importantly, it allows us to reuse code across different views while only writing it once.
Adding some flair
Customizing the UI
Just because you start from a theme, doesn’t mean you can’t get creative with it!
Bootstrap makes it super easy to style pretty much everything using their included classes. For example, bg-primary sets background-color to blue, while btn-secondary makes your <button> white.
But not everyone wants their site looking like an out-of-the box Bootstrap template. I’m going to walk through how to customize Argon Dashboard to match our own brand and colors at DinoSaaS.
Bootstrap comes with a _variables.scss file that specifies everything from $primary and $secondary colors to $border-radius and $box-shadow.
These values are used all across the app – we can change values in one place and immediately have global consistency.
We could go directly into the bootstrap source at bootstrap/_variables.scss and modify them there, but I wouldn’t recommend it. Doing this will make it more difficult down the road to update Bootstrap to a future version.
Instead, you’ll want to make changes in custom/_variables.scss. In general, if a property on a class is set twice, the one that is set last overrides the first. However, bootstrap/_variables.scss uses the !default flag – this assigns a value to a variable only if it’s not already defined.
So even though custom/_variables.scss is included first in our application.scss manifest, variables that are set there will override the bootstrap defaults.
Changing the color scheme
First, we’re going to make some color changes. We’ll set $primary to “Steel Blue”, the lighter blue color used in most of our copy.
Next, we’re going to change our $default color to “Midnight Blue”, the darker blue used in our home page.
Here’s what some of our pages look like with these new changes:
We changed the background color of the top section to “Steel Blue” and the background color of the “Sales value” chart to “Midnight Blue”.
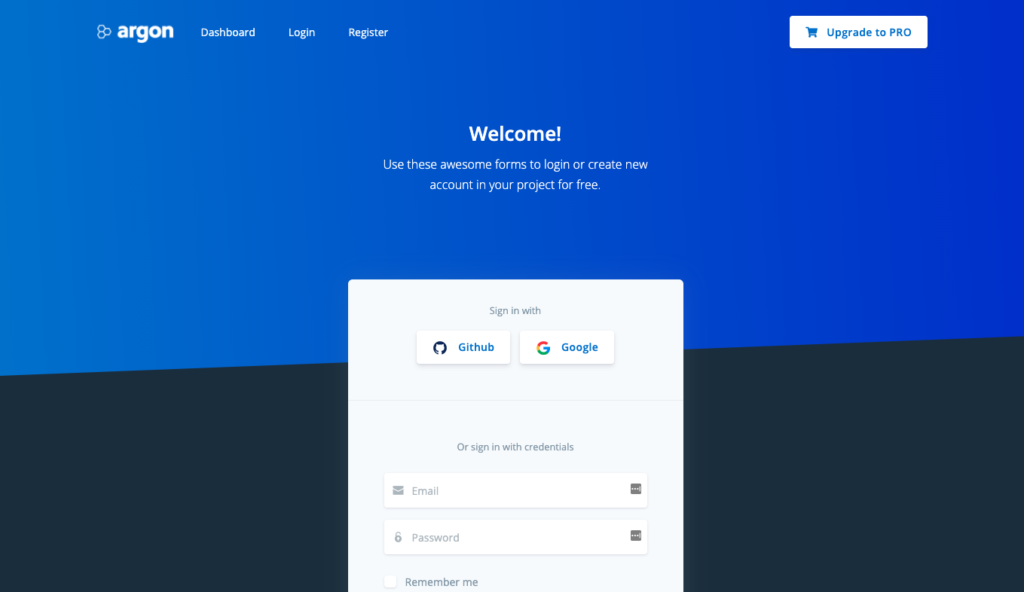
The 2 background colors on the Login page match the new values of $primary and $default as well.
Here are those changes in custom/_variables.scss:
$default: #1f2c3d !default;

$primary: #096ad0 !default;
Updating the logo
The Argon Dashboard logos are stored in /images/brand – there’s white.png and blue.png.
We’ll replace these files with the DinoSaaS white and blue logos, respectively:
![]()
Dashboard with blue logo.
![]()
Login page with white logo.
You can see all the changes related to customizing the UI in Pull Request #2.
Custom Javascript
If you want to extend or remove Javascript code included with the template, edit argon.js.
If you want to add new functionality, I’d suggest starting with new files. In this commit, we’ll add a little greeting that’s sure to inject some user delight into your dashboard experience.
We’ll start by adding a new button to the top of the Dashboard. In dashboard.html.erb, we add this button:
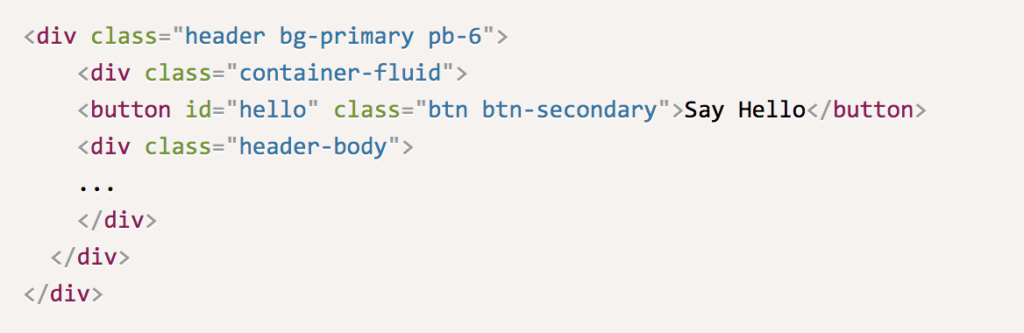
It should look like this:
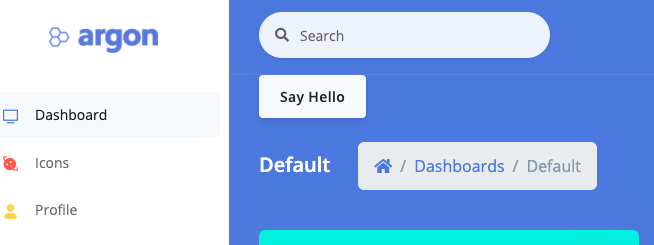
Dashboard with “Say Hello” button
Next, we’ll hook it up to some Javascript. Create a new demo-app.js file in app/javascript. Here, we’ll add the following code:
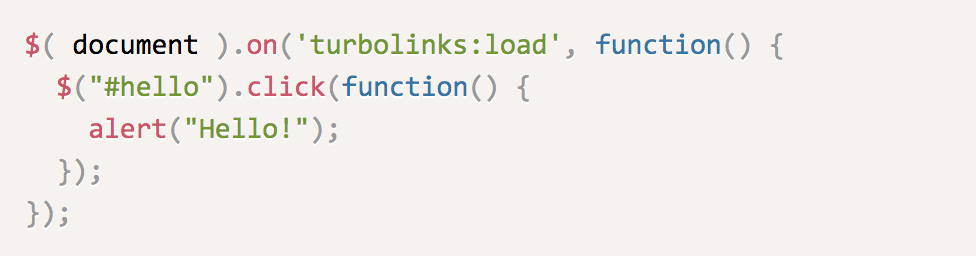
Now we’ll include the new file in application.js:
require("demo-app.js")
Reload the page. Clicking the “Say Hello” button should show you an alert popup like this:
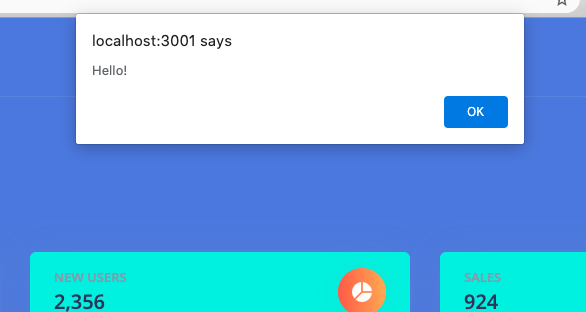
Clicking the “Say Hello” button brings up this alert.
Why are we listening for the turbolinks:load event?
Great question! By waiting for turbolinks:load to fire, we ensure that the button is rendered before we attach its click handler. See this section in the Rails docs on Turbolinks if you want to learn more.
Using real data
By now, you’re probably thinking, Yea these charts look great, but what am I supposed to do with this fake data?!
Snarkiness aside, you’ve got a point. Next, we’re going to populate the “Page Visits” table with real data from our Rails backend.
We’ll start by creating a PageVisit model. We don’t care about tests right now so we don’t generate tests or fixtures.
rails generate model PageVisit page_name:string visitors:integer unique_users:integer uniques_week_over_week:decimal --no-test-framework --skip-fixture
I’ve replaced “Bounce Rate” with “Uniques WoW”, where “WoW” stands for “week-over-week” – the week-over-week change in unique visitors.
Run rails db:migrate to migrate the database.
rails db:migrate
Populate the database with some seed data. We’ll use db/seeds.rb. Run rake db:seed to add the new rows to page_visits.
rake db:seed
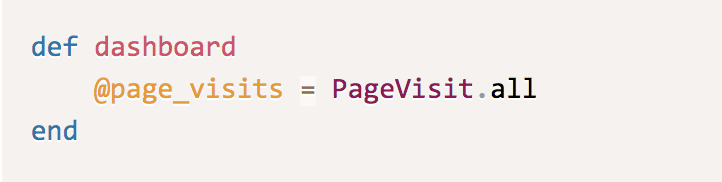
Query page_visits in PagesController. We’ll add this in the pages#dashboard action:
We’ll iterate through @page_visits when rendering the “Page Visits” table on pages/dashboard.html.erb. There, we render the table via the _page_visits.html.erb partial:
<%= render 'pages/dashboard/tables/page_visits' %>
We’ll need to send @page_visits as a local variable when rendering the partial. Otherwise, it will be undefined there.
<%= render partial: 'pages/dashboard/tables/page_visits', locals: { page_visits: @page_visits } %>
Now we can iterate through page_visits in _page_visits.html.erb to populate the table:
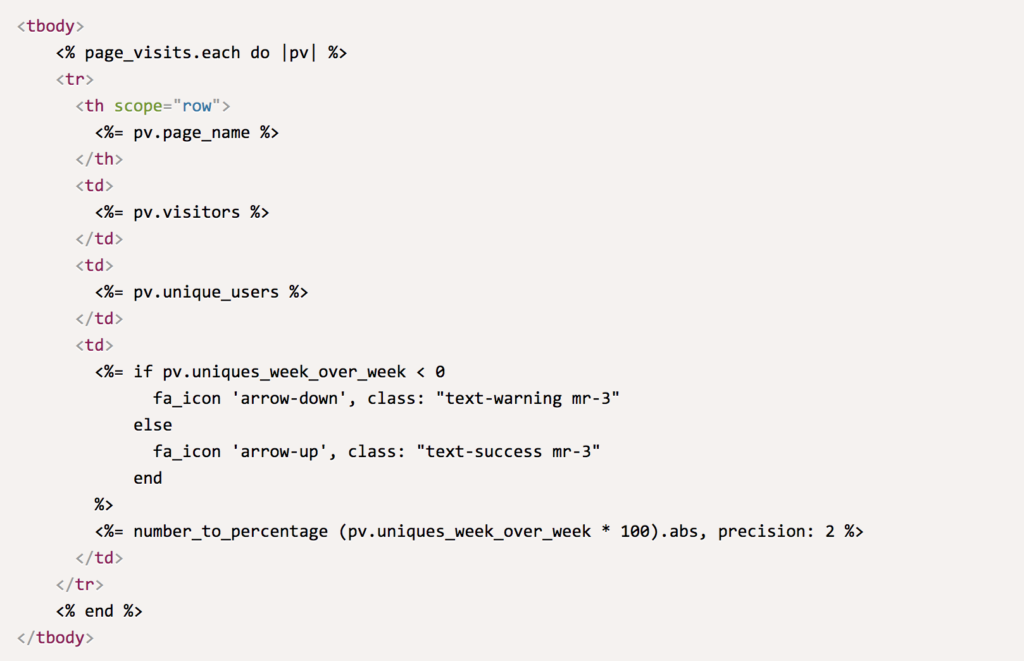
And voila! “Page Visits” now shows our real data from the page_visits table:
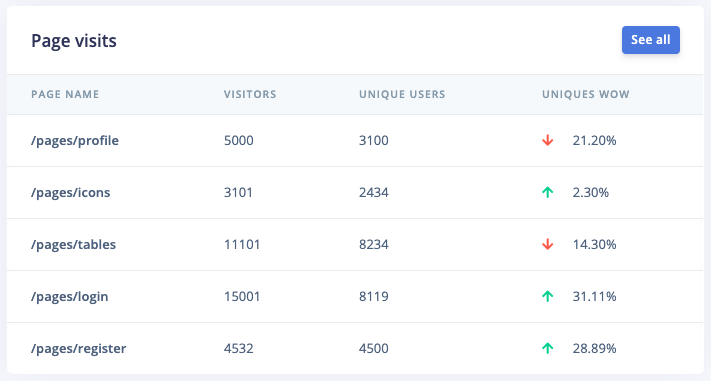
“Page Visits” table populated with “real” data.
You can see all the changes related to integrating real data in Pull Request #1.
Is Argon Dashboard helpful? Star the repo on Github so others it’s legit 🙂
See it in action
BugTracker is a fully-functional SaaS app built on Argon Dashboard.
![]()
BugTracker, built on Argon Dashboard
There you have it – a beautiful, customized web app. Hopefully Argon Dashboard and Ruby on Rails will serve to kickstart your next web application.
DinoSaaS will be releasing more Creative Tim integrations and Rails tutorials soon – if you found this helpful, be sure to check them out and subscribe!

![15+ Top Black Friday & Cyber Monday Deals for Developers and Designers [2023]](/blog/content/images/size/w960/2021/11/black-friday-deals-developers-1.jpg)